Visa for Filipinos: SOUTH KOREA

10:25 PM MeAnn 0 Comments


Check South Korea off your travel bucket list; start by applying for a Tourist Visa!

Like most people, I am also quite intimidated every time I hear the words "Tourist Visa". But when I found out that the Tourist Visa for South Korea is GRATIS / FREE, why not try?! So I filled out the necessary forms, gathered the requirements and tadaaaa! APPROVED!

Here is the step-by-step process on how to apply for a South Korean Tourist Visa.

1. Complete the requirements
      ■ Duly Accomplished Application form (download)**
      ■ 1 pc. passport size coloured picture (attached on the application form)
      ■ Original passport (valid for more than 6 months)
      ■ Photocopy of passport Bio-page
      ■ Original and photocopy of valid visa/s and arrival stamps to OECD countries for the past 5 years (if applicable)
      ■ Original certificate of employment (must include applicant’s position, date hired, compensation, office address, HR landline number (cell-phone number is not allowed), HR e-mail address)
      ■ Original personal bank certificate (must include account type, current balance, account opening date, ADB)
      ■ Bank statement (original or certified true copy of bank statements/passbook for the last 3 months)
      ■ ITR (Income Tax Return) or Form 2316 Copy**
      ■ Copy of PRC Card or IBP Card (If applicable only)

      ** Application form must be (a) printed in an A4 size bond paper, (b) clean with no erasures and(c) written in BLOCK letters.
      ** Frequent travellers who have travelled as tourist to OECD member countries within 5 years are exempted from submitting ITR.

Additional Requirements:
If personally invited by Korean
      ■ Invitation letter
      ■ Photocopy of invitor's Passport or Identification Card (authentication not required).
If invited by a company in Korea
      ■ Invitation letter
      ■ Photocopy of Korean Company Business Permit (authentication not required).

2. Submit all the requirements to the Korean Embassy
Secure all the documents in a brown envelop (in order) and submit them to the Korean Embassy.

Address: 122 Upper McKinley Road, McKinley Town Center, Fort Bonifacio, Taguig City, Philippines 1634
Contact Number: +63 2 856-9210
Application Time: 8:30AM to 11:00AM

      ■ Register at the guard's station upon entering the embassy.
      ■ A personnel by the door will check if you have all the necessary documents, once he's satisfied he'll give you a number.
      ■ Wait for your number to be called.
      ■ The staff on the window assigned to you will again check your requirements and will give you a piece of paper with the DATE OF RELEASE.

** Windows 1 and 2 are for first-time applicants while Window 3 is for frequent travellers who have been to OECD member countries within 5 years
Visa Fee:
      ■ 59 days (or less) stay in South Korea - GRATIS
      ■ 60 - 90 days stay in South Korea - PHP 1,800.00

3. Relax and wait for the result.
Visa Processing Time:
      ■ 3 working days for those who have been to OECD member countries within 5 years as tourist
      ■ 5 working days for those who have not been to OECD member countries within 5 years

4. Claim your passport
The moment of truth! Head back to the Korean Embassy on the date of release from 13:30PM to 16:00PM and claim your passport (approved or not).

FACTS: Just in case you're curious.
      ■ I have a valid US Visa.
      ■ I have been to an OECD member country.
      ■ I had PHP 40,000 on my account for the Bank Statement.

DISCLAIMER
I'm not an expert. I cannot tell whether or not your application will be approved. 
But I'll try to help as much as I can. Good luck!

0 comments:

Visa for Filipinos: INDIA

8:20 AM MeAnn 2 Comments


From VISA ON ARRIVAL to E-VISA. (Category: Tourist)

Not sure when, but India announced an e-Tourist Visa scheme for Philippine passport holders; making it easier for travelers from the Philippines and many other different countries to get access to India.
YEP! NO MORE VISA ON ARRIVAL. HELLO ONLINE APPLICATION!!! *confetti shower*

I find this more worry-free and convenient than visa on arrival, TBH. 😍

Anyway! Here are guidelines on how to apply for an Indian Tourist E-visa.

ELIGIBILITY
      ■ Travelers whose sole objective of visiting India is recreation and sight seeing.
      ■ Passport should have at least six months validity from the date of arrival in India.
      ■ The passport should have at least two blank pages for stamping by the Immigration Officer.
      ■ Travelers should have return ticket or onward journey ticket,with sufficient money to spend
         during his/her stay in India.
      ■ Not available to Diplomatic/Official Passport Holders or Laissez-passer travel document
         holders.
      ■ Not available to individuals endorsed on Parent's/Spouse's Passport i.e. each individual should
         have a separate passport.
      ■ Not available to International Travel Document Holders.


REQUIREMENTS
      ■ Duly filled Online Application Form.
      ■ Passport - Clear scanned copy of bio page (page 2) | PDF Format | File Size: 10KB - 300KB
      ■ 2x2 Picture - Light colored or white background | JPEG Format | File Size: 10KB - 1MB


APPLICATION: How to fill up the application form?
Step 1: Go to https://indianvisaonline.gov.in/visa/index.html
Step 2: Select the "Regular Visa Application" tab, fill up the registration form then "Continue".


Step 3: Fill up the Application Form (Personal Details)

Page 1
      ■ Citizenship / National ID No.: I keyed in my UMID No., if you don't have UMID. Type your  
         SSS (I realized it too late that "N/A" is also acceptable)
      ■ Visible Identification Marks: If you have visible identification mark (such as birthmark or
         tattoo) type in the information there. Otherwise, type “NONE”.
      ■ Educational Qualification: Check the details below.
            • Below Matriculation – less than 10th grade education

            • Graduate – College or university education

            • Higher Secondary – High school education

            • Illiterate – Not formally educated

            • Matriculation – 10th grade level education
            • Post Graduate– advanced study beyond college or university (MA, PhD, etc.)
            • Professional – professional /technical training or certification


Page 2
Page 3

      ■ Here's a list of SARRC Member Countries:
            • Afghanistan

            • Bangladesh
            • Bhutan
            • India
            • Maldives
            • Nepal
            • Pakistan
            • Sri Lanka
      ■ Reference name in India: I filled this up with the details of the hotel I want to stay in upon
         arrival.

Step 4: Upload your 2x2 picture.


Step 5: Upload your Passport Bio Page


     ■ Again, it has to be in PDF format. The site has a limit of up to 300KB for Passport upload, so if
        your file is bigger than 300KB try to compress it using PDF COMPRESSOR.

Step 6: Review and confirm your details.

     ■ Make sure that all details are correct. At this point you can still modify it if necessary.

Step 7: Pay the E-visa fee, wait for the e-mail confirmation and tadaaah! You're done.


     ■ You will be asked which site you'd like to use for online payment - SBI E-pay or Axis.


     ■ The total fee is USD 51.25 / PHP 2,631 
        (E-Visa - USD 50 | Processing Fee - USD 1.06 | GST - USD 0.19)


     ■ Once your payment is confirmed they will send you an email like this...

     ■ Now, sit back, relax, and wait for the result. I submitted mine on a weekend and the result was emailed to me in LESS THAN 24 HOURS!


GRANTED! YEY!!!

NOTES:

     ■ Applicants may apply for as early as 120 days before arrival. But if you're very excited, you can 
        apply for as late as 4-5 days before arrival.
     ■ The E-Visa is good for 120 days from date of issue for a stay of up to 60 Days - Double Entry.

SEE YOU IN INDIA!!! 😍😍😍

DISCLAIMER
I'm not an expert. I cannot tell whether or not your application will be approved. But I'll try to help as much as I can.
Please be sure to check the visa website for updates. Good luck!

2 comments:

#TaiwanAndOnlyMe | How I Spent 3 Days in Taiwan

9:05 PM MeAnn 0 Comments


Taipei, Taiwan - A city of lights, sights and gastronomic delights!
It's not my first time in Taiwan, but since the reason I went there the first time was work, I felt the need to come back and experience what more it has to offer.

For Philippine Passport Holders, an e-visa requested thru this website is a must. The application fee for an e-visa is NT$ 1,632.00 including the NT$ 32.00 processing fee for online credit card payment.
However, Philippine Passport Holders with valid US, UK, Japan, Canada, Australia, New Zealand and/or Schengen visas can apply for a travel certificate for free thru this website.
(NEWS: The implementation of visa-free entry to Taiwan for Filipinos has been re-scheduled to September 2017.)

Travel Date: August 19-21, 2017
DAY 1: ARRIVAL | KEELUNG TOUR


03:00 AM Arrival at Taoyuan International Airport

Since I am a cheapskate, I did not book a hotel for my arrival.
Based on my research(?), Taoyuan Airport has resting areas and shower areas where you can stay for the night (and yes, they really have them. For reference: click here).
 The shower area opens at 06:00AM and both the resting and shower areas are located BEFORE IMMIGRATION - for arriving passengers. For departing passengers, It's located AFTER IMMIGRATION - this one is open 24 hours.

07:00AM Taoyuan Airport to Taipei City


There are two types of trains heading to Taipei Main Station from the Airport - Commuter and Express. Both are worth NT$160.00 per way. You can buy an Easy Card at the metro for NT$ 100.00 (this is just for the card itself), top it up and you're ready to go! If you run out of load, you can always top-up at the nearest convenience store or the metro.

Afterwards I went to my hotel in Ximen, checked-in and went straight to Taipei Main Station to catch the bus going to Keelung.

10:00AM: Off to Shen'ao!

Taipei Main Station → Keelung
Take the (sorry I forgot the bus number >.<) Kuo Kuang Bus heading to Keelung. It takes an hour to get there from Taipei.

Keelung → Shen'ao Fish Port
Go to the Tourist Information Center (get maps and ask for bus schedules. Just so you'd know what else to do and where else to go.)
Ride another bus (Bus no.: T99) going to Shen'ao Fishing Port (another 45-min. bus ride).

Shen'ao Fish Port → Elephant Trunk Rock
From the bus station the Elephant Trunk Rock is an 800m-walk away.
It's quite difficult to find 'coz there are no signs so I made a map!


It's a long walk, especially if you do not know where to go. But the scenery is worth it!
By the way, if you're traveling solo (like me) I suggest you bring a tall tripod. I brought my small gorilla pod thinking it would suffice, but there are no trees or big rocks to clamp it to. I could have taken better selfies but... oh well! Lesson learned.


You can also go to the other side to see this...

After the Rock Formations I headed back to Keelung, I was planning to go around Keelung City 'coz I had plenty of time, but I felt quite tired because I didn't have enough sleep so I just went back to my hotel in Ximen, did a little shopping and slept.

DAY 2: Yehliu, Jiufen, Shifen and Pingxi

06:30 AM Start Coastal Tour


Taipei Main Station → Yehliu Geopark
Took the 1815 Kuo Kuang bus at the Taipei Main Station, the ride takes about an hour. And again, when you get to Yehliu Bus Station, there are no signs where to go so... check the map below! The park is a 10-15min. walk away from the station.


Entrance to Yehliu costs NT$ 80.00

If you're able to get there early morning you'd be one of the first people to enter and you'd have the park for yourself - awesomesauce!


So after my walk in the park, I went straight to Jiufen.

Yehliu Geopark → Jiufen
Ride a bus going to Keelung and transfer to a bus going to Ruifang, the whole ride takes 2 hours, could be more but lucky for me, I was just in time for the bus to Ruifang.


Jiufen → Shifen
Ride a bus going to Ruifang and take the train going to Pingxi. Alight at Shifen Station.


Shifen Station → Shifen Waterfall (v.v)
Walk to the highway (mapee mapee!) and ride a bus from Shiufenliao going to Shifen Waterfall. The ride takes less than 5 minutes. (going back, it's all the same)


Shifen → Pingxi
Go back to the train station and ride the train going to Pingxi.


Pingxi → Taipei City
Take the train going back to Ruifang, at the bus station in front of Ruifang Train Station take the 1815 bus going to Taipei and tadaaaaa! You're back in the city. You can do whatever you want now.

As for me I chose to be pooped on by a mysterious bird in Ximen. >.< (be extra careful in walking under trees; you've been warned!😁)

23:00 PM Lights out.


DAY 3: Taipei City Tour

09:00 AM Start City Tour


I bought a 1-day Taipei Pass at the metro. There are two types of 1-day Taipei Pass and the one posted on their website is the 24HR Pass that costs NT$ 180.00 (PHP 300.00); the other one (the one I availed) is the Full Day Pass (same date expiration) worth NT$ 150.00 (PHP 250.00).

What I did:
Ximen → Taipei Main → Longshan Temple → Chiang Kai Shek Memorial Hall → Taipei 101 → Dahu Park → Dr. Sun Yat Sen Memorial Park → Xingtian Temple → Tamsui Station → Ximen (Modern Toilet Restaurant)


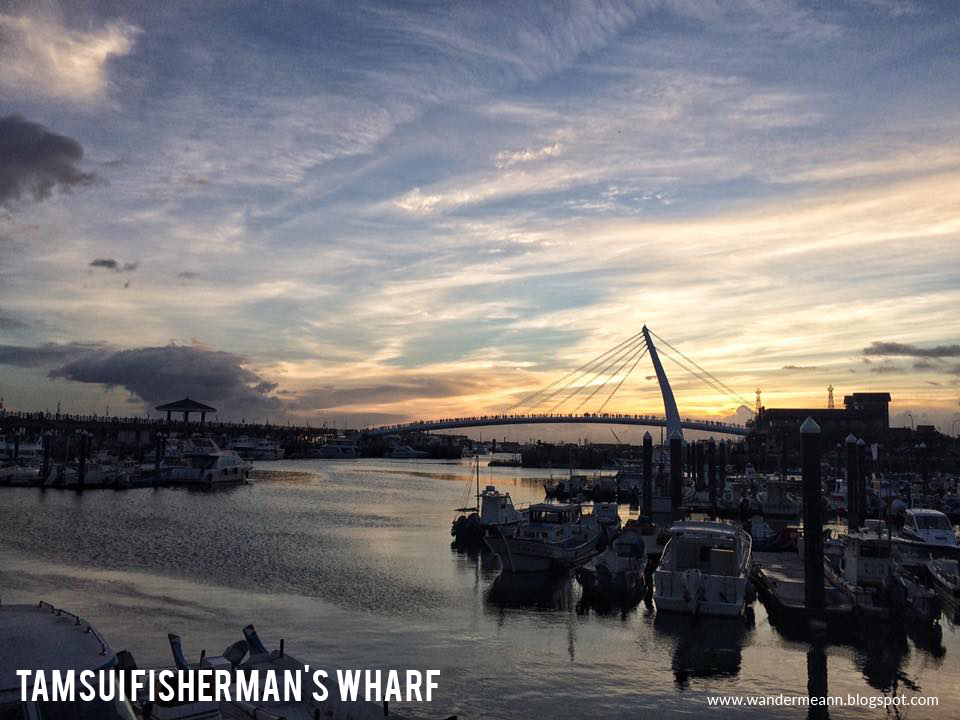
Tamsui station → Tamsui Fish Wharf
Took bus R26 (Red 26) towards the wharf but there are alternatives: Bus 836 or 857 onwards.
The ride will take about 15-20 minutes. Yes, it's quite far.

And... PICSPAAAAAAM!!!


Modern Toilet


I do not suggest doing Dahu Park and Tamsui Fisherman's Wharf in one day; both locations take time to get to, and if you wish to see the sunset in Tamsui - forget about Dahu! But if it's okay with you to go around the Fisherman's Wharf at night, then... why not? haha! Just make sure that you won't miss your flight. Take note of the bus schedules.

09:00 PM Travel to Airport - Bye bye Taiwan!

Bring snack on your way to the airport. Shops in Taoyuan Airport close at night, but there are beverage vendos accepting coins (only) everywhere!

SUMMARY

Day 1:

03:00 Arrival at TPE
07:00 Airport to Taipei City
10:00 Departure Taipei Main Station to Keelung (Start tour)
** Shen'ao Fishing Port
** Elephant Trunk Rock
17:30 Arrival at Ximen Walk (End tour)

Day 2:

06:30 Departure Taipei Main Station to Yehliu
07:44 Arrival at Yehliu Bus Station (Start tour)
** Yehliu Geopark
** Jiufen Old Street
** Daitian Temple
** Shifen Waterfalls
** Shifenliao Bridge
** Pingxi
19:30 Arrival at Ximen Station (End tour)

Day 3:

09:00 Start City Tour (Ximen Station)
** Longshan Temple
** Chiang Kai Shek Memorial Hall
** Dahu Park
** Sun Yat Sen Memorial Park
** Xingtian Temple
** Tamsui Wharf
** Ximen Walk (Modern Toilet)
21:00 End Tour (Depart to Airport)

Rates / Expenses
(1 TWD = 1.67 PHP)

Easy CardTWD 100.00
Easy Card Top-up (3 days)                      TWD 800.00
1-Day Taipei Pass (24 Hrs)TWD 150.00
Yehliu Entrance FeeTWD 80.00
Bottled WaterTWD 20.00 - 40.00
MealsTWD 30.00 - 300.00
SouvenirTWD 70.00 - up


Budget Breakdown

Travel Tax - PHP 1,620
Pocket Money - PHP 6,000
Airfare - PHP 7,100 (regular fare)
Accommodation - PHP 3,000
TOTAL: PHP 17,720🎊

P.S. I booked an expensive flight. Yes, I'm that impulsive. Anyway, a friend of mine booked her flight for PHP 3.5k; some people I know even booked it for less - promo fares. So keep yourself updated and grab those deals!!! Also, going solo, there are other hotels you can book, again, for less, starting at PHP 600.00 per night. The whole trip was awesome, but it was scorching hot! If you wanna visit Taiwan, the best month would be November - dry and a bit cold (because WINTER IS COMING) hahaha!!!

HAPPY TRIP!!!

0 comments: